机制解析 在k8s中,DNS解析有两套,一套是k8s集群自带的dns解析,由CoreDNS组件维护,一套是节点自带的DNS系统(即/etc/resolve.conf那一套)
这个跟网络插件无关,无论使用什么CNI k8s都会部署CoreDNS
通过dnsPolicy参数 进行控制,这个参数在pod以及各种控制器的spac下都可以找到
dnsPolicy 效果
ClusterFirst(默认)先查 CoreDNS,查不到再转发上游
Default用 Node 的 DNS,不走 CoreDNS
None完全自定义,需要手动指定 dnsConfig
ClusterFirstWithHostNethostNetwork Pod 也能用 CoreDNS
让节点访问k8s域名(不推荐) 这就是为什么在节点是无法访问通K8s内部的域名,但是之前研究过一些邪修的方法,可以让系统直接访问,如下
https://akemi.zj.cn/2025/10/21/Ubuntu-resolve/
我当时就是为了让hostNetwork Pod访问CoreDNS的,纯力大砖飞,不建议使用
如果想让hostNetwork Pod访问CoreDNS,直接dnsPolicy改成ClusterFirstWithHostNet就可以了
hostAlias修改域名解析
hostAliases CoreDNS file 插件
配置在哪
Pod YAML 里
CoreDNS ConfigMap 里
生效范围
只有这个 Pod
集群所有 Pod
改了要重建 Pod
✅
❌ CoreDNS 自动 reload
支持多 A 记录轮询
❌ 一个 IP
✅ round_robin
支持 CNAME/SRV
❌
✅
适合场景
几个 Pod 需要特殊解析
集群级统一域名管理
举个例子,并不是不行,特别是比如你的文件分了N份放在nacos里,不同的业务用不同的nacos里的配置,或者是你要用一个pod模板进行工作流工作,就很适合使用这种
1
2
3
4
5
6
7
8
9
10
11
12
13
apiVersion: v1 kind: Pod metadata: name: my-app spec: hostAliases: - ip: "10.0.0.100" hostnames: - "mysql.internal" - "db.internal" containers: - name: app ...
CoreDNS自定义域名解析 本质上是将CoreDNS作为一个权威DNS服务器来使用
CoreDNS 的配置 = Corefile(存在 ConfigMap 里)
1
2
3
4
5
6
7
8
9
10
11
12
13
14
15
16
17
18
19
20
21
默认配置文件: .:53 { errors health { lameduck 5s } ready kubernetes cluster.local in-addr.arpa ip6.arpa { pods insecure fallthrough in-addr.arpa ip6.arpa ttl 30 } prometheus :9153 forward . /etc/resolv.conf { max_concurrent 1000 } cache 30 loop reload loadbalance }
创建新coreDNS配置文件(dns解析文件) 1 2 3 4 5 6 7 8 9 10 11 12 13 14 15 16 17 18 19 20 21 22 23 24 25 26 27 28 29 30 31 32 33 34 35 36 37 38 39 40 41 42 43 44 45 46 47 48 49 50 51 52 53 mkdir coreDNScd coreDNS/cat > wangsheng-dns-cm.yaml <<'EOF' apiVersion: v1 kind: ConfigMap metadata: name: wangsheng-dns namespace: kube-system data: db.wangsheng: | $ORIGIN open.wangsheng.cn. $TTL 3600 @ IN SOA ns1.open.wangsheng.cn. admin.open.wangsheng.cn. ( 2025030101 ; Serial 7200 ; Refresh 3600 ; Retry 1209600 ; Expire 3600 ; Minimum TTL ) @ IN NS kube-dns.kube-system.cluster.local. @ IN A 122.14.236.76 @ IN A 122.14.236.77 EOF kubectl apply -f wangsheng-dns-cm.yaml kubectl -n kube-system describe configmap wangsheng-dns Name: wangsheng-dns Namespace: kube-system Labels: <none> Annotations: <none> Data ==== db.wangsheng: ---- \$ORIGIN open.wangsheng.cn. \$TTL 3600 @ IN SOA ns1.open.wangsheng.cn. admin.open.wangsheng.cn. ( 2025030101 ; Serial 7200 ; Refresh 3600 ; Retry 1209600 ; Expire 3600 ; Minimum TTL ) @ IN NS kube-dns.kube-system.cluster.local. @ IN A 122.14.236.76 @ IN A 122.14.236.77 BinaryData ==== Events: <none>
修改coredns的configmap kubectl -n kube-system edit configmap coredns
1
2
3
4
5
6
7
8
9
10
11
12
13
14
15
16
17
18
19
20
21
22
23
24
25
open.wangsheng.cn:53 { health file /etc/custom/db.wangsheng loadbalance round_robin } .:53 { errors health { lameduck 5s } ready kubernetes cluster.local in-addr.arpa ip6.arpa { pods insecure fallthrough in-addr.arpa ip6.arpa ttl 30 } prometheus :9153 forward . /etc/resolv.conf { max_concurrent 1000 } cache 30 loop reload loadbalance }
挂载新配置文件给coreDNS kubectl -n kube-system edit deployment coredns
1
2
3
4
5
6
7
8
9
10
11
12
13
14
15
16
17
18
19
20
21
22
23
24
25
26
新添加Configmap作为挂载: volumeMounts: - name: config-volume readOnly: true mountPath: /etc/coredns - mountPath: /etc/custom name: wangsheng readOnly: true volumes: - name: config-volume configMap: name: coredns items: - key: Corefile path: Corefile defaultMode: 420 - name: wangsheng configMap: name: wangsheng-dns defaultMode: 420 kubectl get pods -n kube-system | grep core coredns-bff78b6d9-dc2kf 1/1 Running 0 54s coredns-bff78b6d9-nmxms 1/1 Running 0 54s
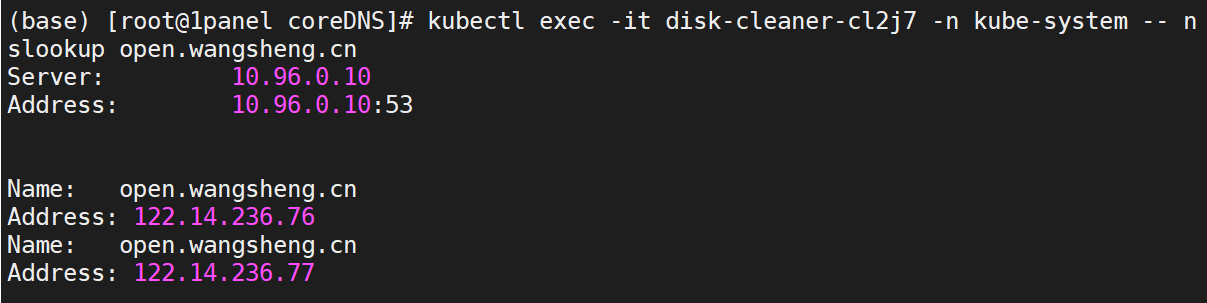
验证 1 2 3 4 5 kubectl run dns-test --image=busybox --rm -it -- nslookup open.wangsheng.cn 如果没有busybox镜像,直接在现有pod里测试应该也可以: kubectl exec -it disk-cleaner-cl2j7 -n kube-system -- nslookup open.wangsheng.cn